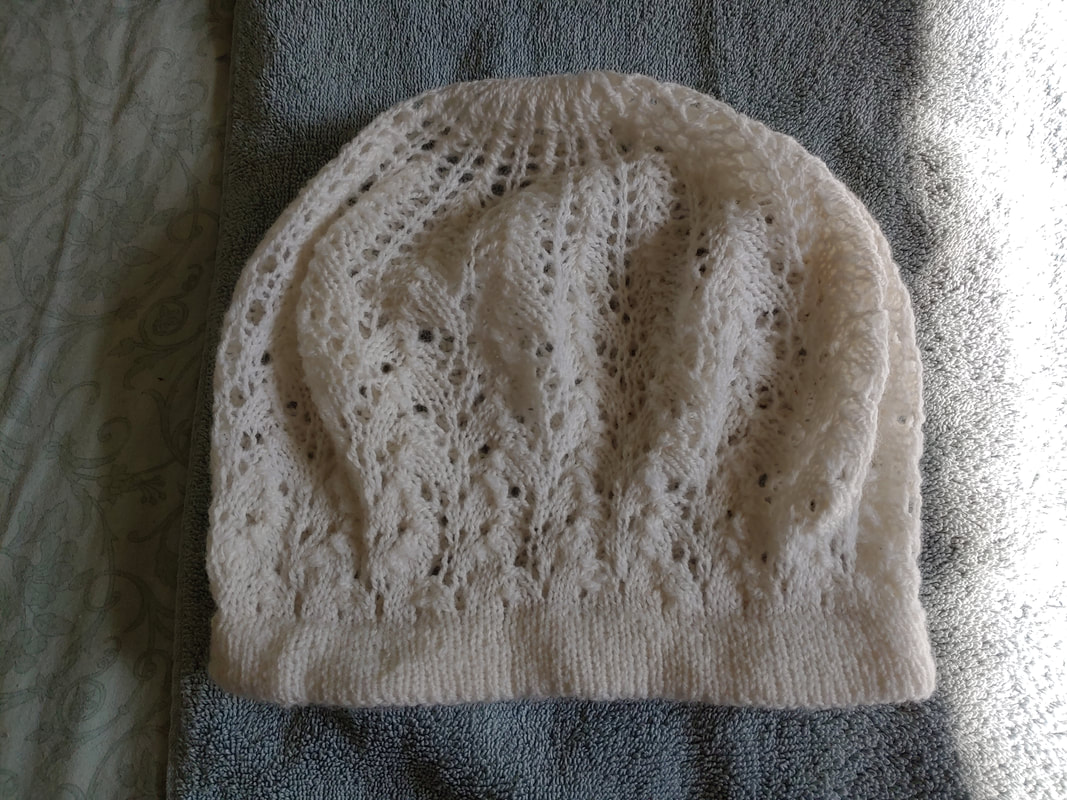
 My mother in law (MiL) once told me that she always wanted an angora (bunny) hat, so come the Maryland Sheep and Wool Festival 2019 (MDSW 2019) I was on the hunt for the perfect skein. I found "the one" at Mainely Yarns. A blend of Ramboulliet and angora, it is squishy, buttery smooth, soft, and has a muted halo. I expected a much more pronounced halo from working with it, but it never happened. It should fluff out with use, so I'll have to check with my MiL. Doing a lace hat was kind of risky as the halo may overtake the lacework, but this yarn was destined for the Ishbel Beret. The Ishbel Beret was written by Ysolda Teague and is available on Ravelry. 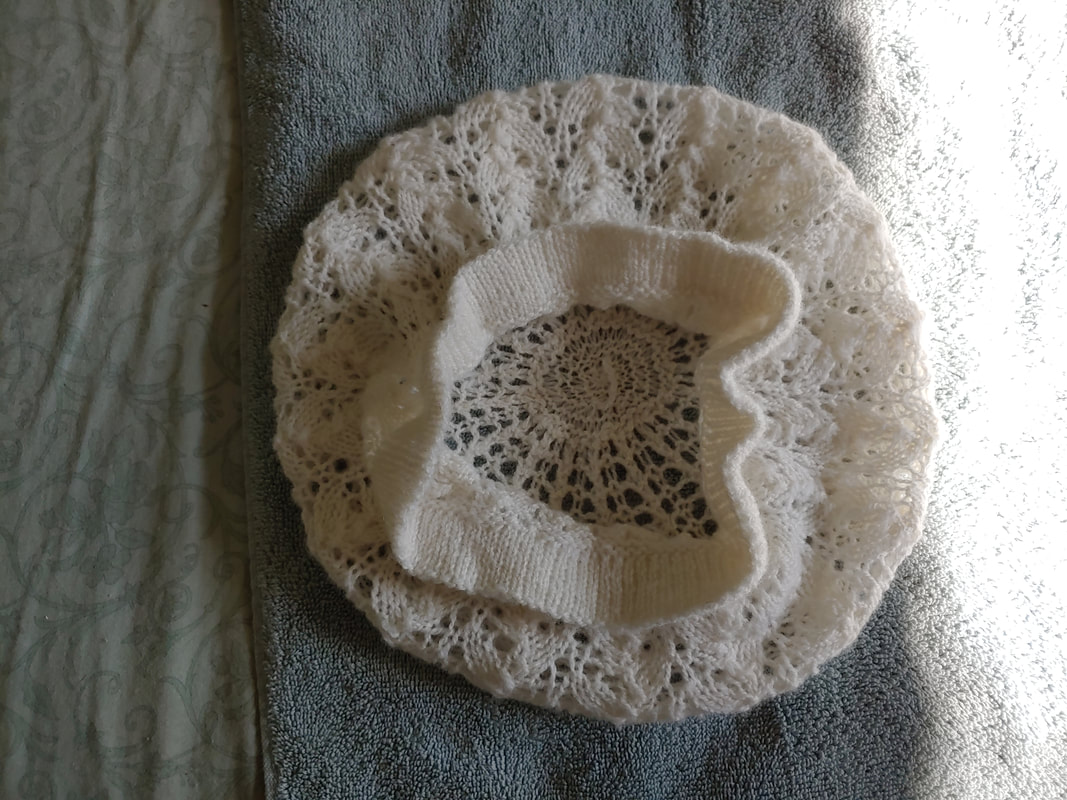 The beret has a fold-over hem so that it provides the hat band with some structure. With such a dainty yarn, this was important. It's also attractive, and a design element that I had not ever used before. I think more hats should implement this kind of hat band. The pattern is lovely, straightforward, and an easy knit if you're comfortable with lace work. 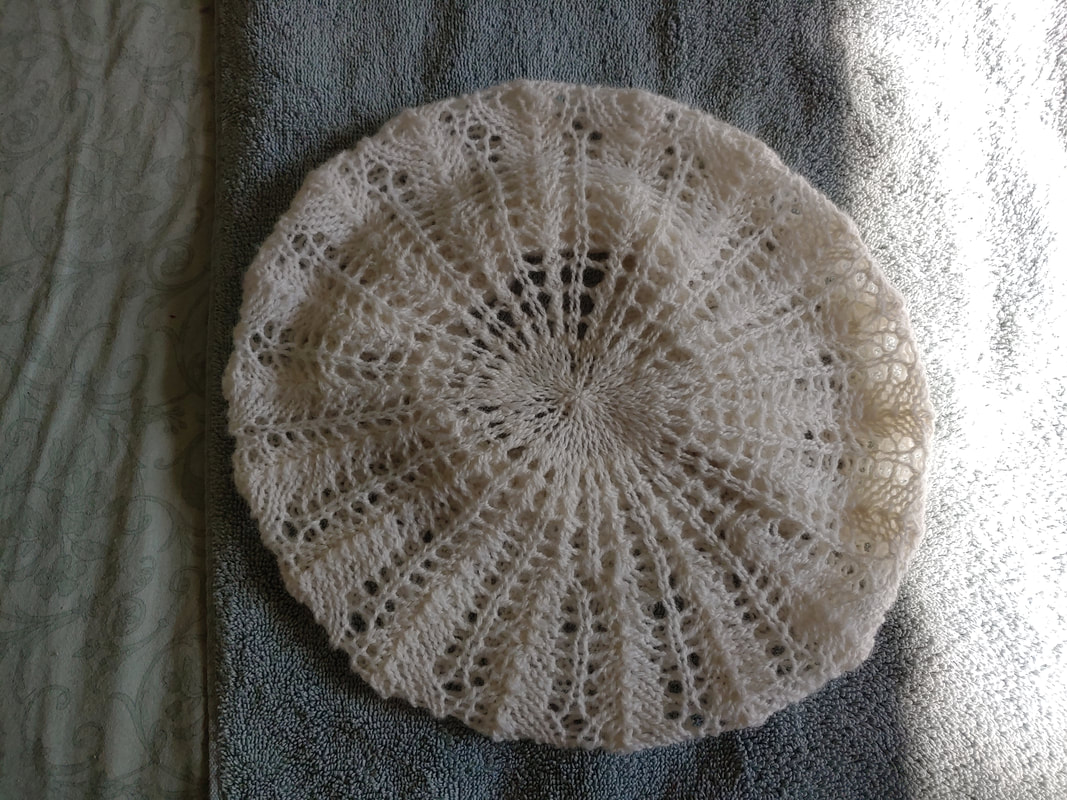 Never having used this blend of yarn, let alone Rambouillet OR angora, I was a bit anxious. Oh, and it should be noted that I *never* block anything. This wasn't a situation where I could get away with that, and the hat band was already the right circumference, so yeah, anxious. Now imagine Kim, already anxious, blocking this hat, watching it grow and grow in the warm water. My terror intensified, but I carried on, gently rolling it up in a towel, pressing water out with the towel, then blocking it around a large dinner plate. It stretched and stretched, the stitch definition finally coming through, and the band kept size as I situated it into position. In came out gorgeously. The pictures above are awful and give no credit to the beauty of the hat. I wish I had a photo of it on my MiL, but that'll have to happen maybe over Easter when I see her next. She notoriously hates photos, so we'll see what I can pull off.
Start: May 6 2019 Finish: May 24 2019 Ravelry
0 Comments
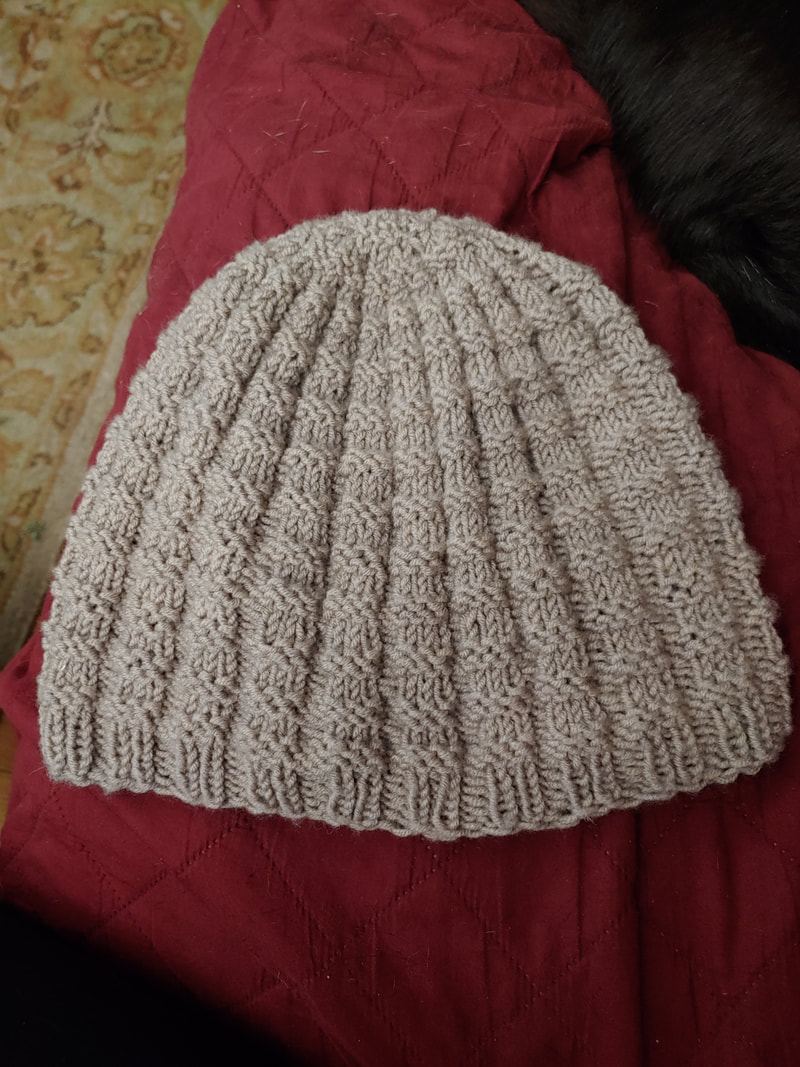
Ari is running low on hats, so a hat state of emergency has been declared! Presenting Christian's Hat pattern by Ágnes Kutas-Keresztes. Not only was it a breeze to knit (read: gloriously mindless), the pattern is *free*. I used Jaeger DK Merino that I got before 2010, so it counts as stash busting!  Nice hat, nicer husband.
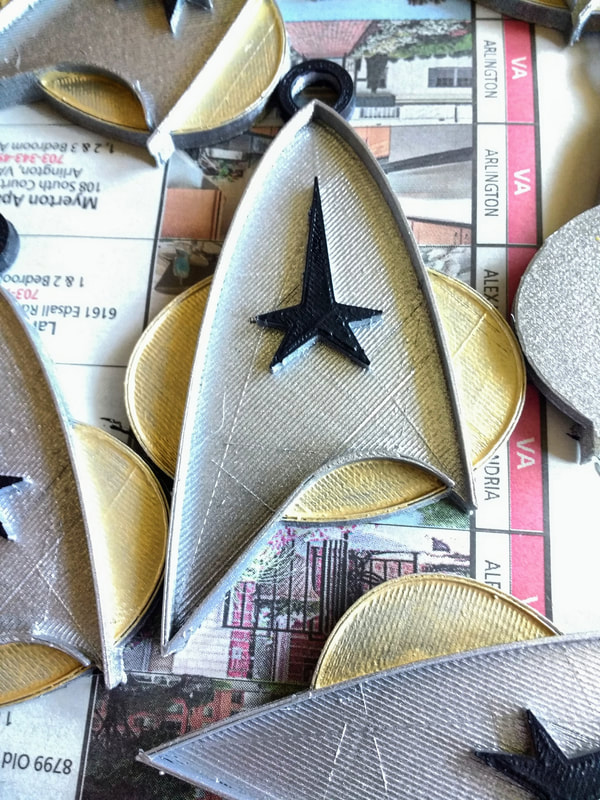 A neighbor was kind enough to do us a favor at the 13th hour, and I wanted to do something special for him. A little birdy told me that he was on the hunt for Star Trek and Star Wars Christmas ornaments, and that he would especially like Star Trek comm badges. I went straight to Thingiverse to hunt them down and found this: www.thingiverse.com/thing:2098911. Being that I code in OpenSCAD I was excited to see how the creator, KySyth, had designed the comm badge. Upon inspection of the code, I determined that it had to be refactored and remixed. To this end I copy edited the code, reorganizing it, and adding comments to make it read more easily. I changed some of the code. I changed the rendering colors to reflect the actual badge colors, and added the loop at the top of the comm badge so that they can be strung up to hang as an ornament. I printed them in silver ABS to facilitate a good color surface to spray paint them silver. I then hand painted the rest of the comm badge ornaments using acrylic paints. 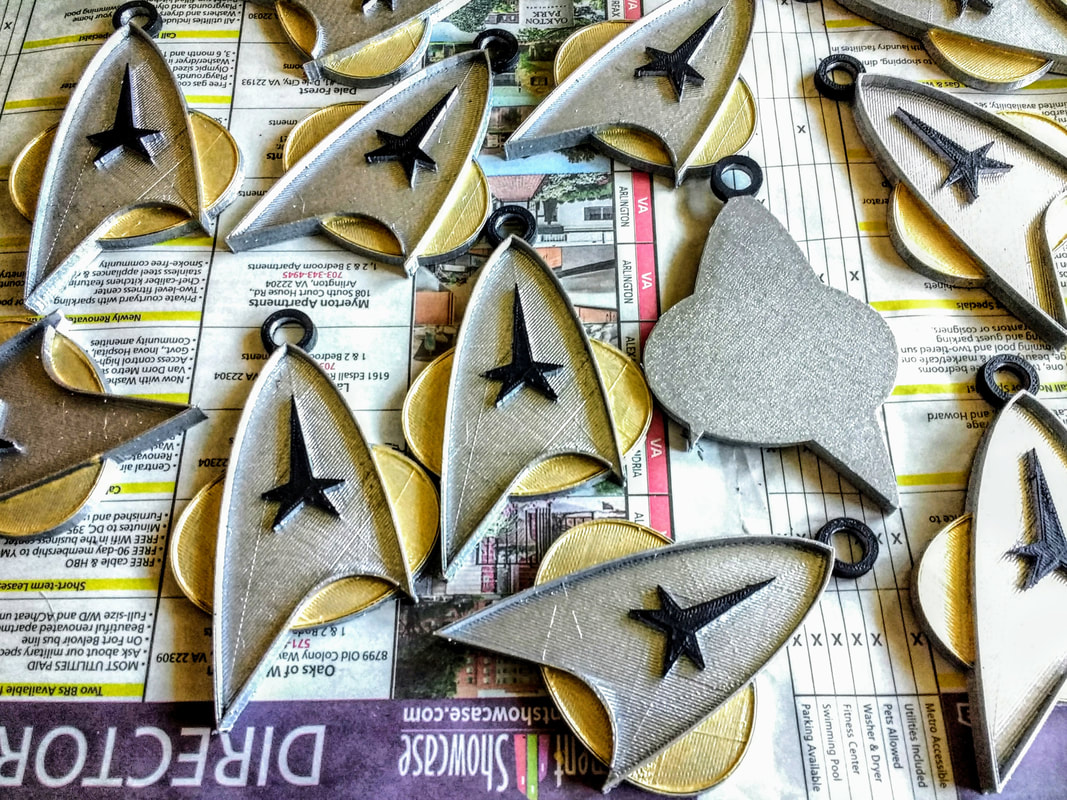 I'd be lying if I did not admit that I have a fondness for tiny hats. Were it not for all the equipment that lives in this fab-lab of a house, I'd have dozens on display in a glassed in cabinet. However, the equipment is far more useful and (kinda...) less eccentric than a collection of tiny hats, so the hats lose out. I told myself that I'm not allowed to purchase anymore, right up until I found a loop-hole: It doesn't count if I make them myself. So, I present to you the Tiny Tricorne and the Tiny Witch's Hat!  I designed the Tiny Tricorne not only to feed my tiny hat addiction, but as an exercise in using living hinges. Living hinges are used to allow a single sheet of material to be able to flex, bend, or curl on itself without the use of separate sections of material that need to be affixed (like hinges, straps, etc). They are grid like, with gaps or cutouts in the material running parallel to the flex site. The hat was designed using OpenSCAD with a living hinge file developed by DrXenocide of Thingiverse (www.thingiverse.com/thing:1736879). It was 3D printed in ABS plastic as opposed to PLA - this is because PLA is harder than ABS and would not be able to flex properly at the hinge site. The hat was designed with the same number of holes around the crown as flaps so that the flaps could be stitched to the crown. The underside of the hat has strategically placed openings to facilitate attaching the flaps to the crown, as well as sites to attach elastic. The elastic slides over hard plastic headbands to allow the wearer to adjust the position of the hat. The flower was a download off of Thingiverse.com, and attached with hot glue. 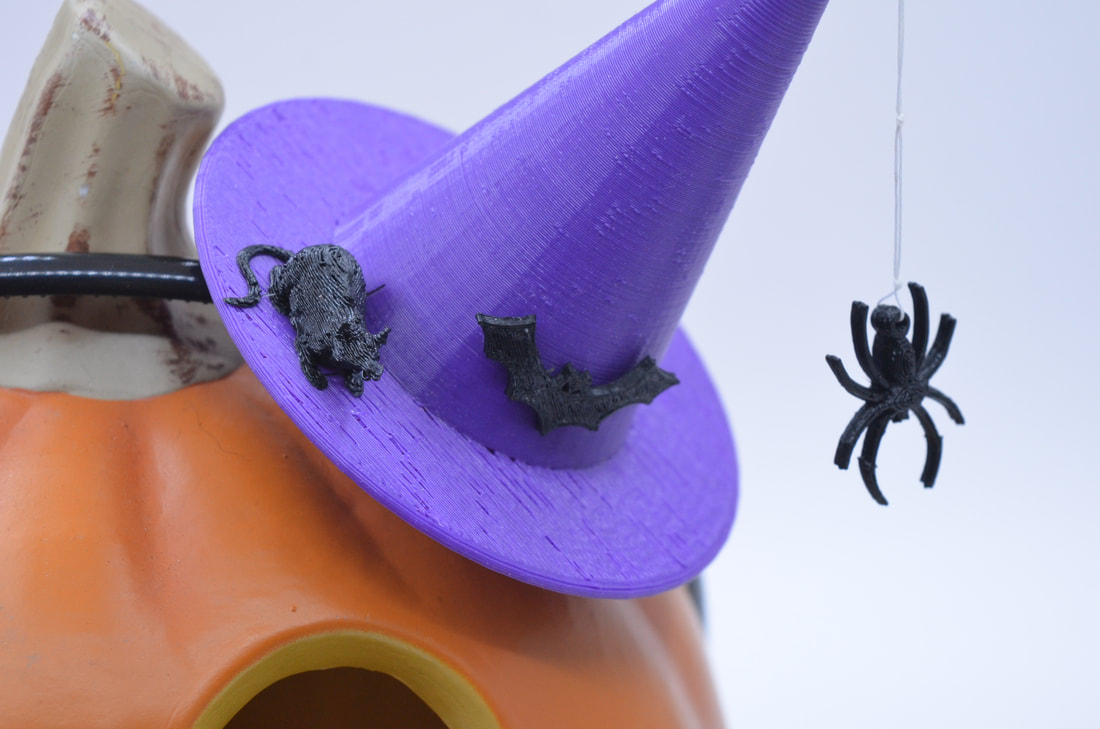 The Tiny Witch's Hat was designed soon after the Tiny Tricorne as a Halloween novelty. The underside of the hat is designed like the Tiny Tricorne with openings to attach the elastic, and to run the spider's "web." The tip of the hat has an opening large enough to thread the web through and secure. The rat, bat, and spider were downloaded off of Thingiverse. The rat and bat are affixed with superglue. The spider was printed flat, so two spiders are glued together to produce a double sided spider. Were I to make another. I would use a heat gun to soften the bat to wrap around the cone section of the hat. The hat is worn cocked to the side so that the spider dangles freely.
Do you have any ideas for more tiny hats? If so, send me a message and we'll brainstorm! I present to you one of my favorite, and most challenging, personal projects: The Aufbau Principle Ugly Christmas Sweater. I purchased the sweater online, and rigged it up with a Sparkfun Lilypad, and a variety of colors of LEDs. I programmed the Lilypad to produce different effects for the LEDs. This project required a variety of skills, such as concept of design, construction, circuit diagrams, programming, sewing, and extreme patience. It is powered by a Li-ion battery, and is machine washable once the battery is removed. Below I've included a video of the sweater blinking. I'd very much so like to make more "ugly Christmas" sweaters, so if you are interested, please contact me, and we'll see what we can come up with. A lot of things have happened since August 2017 -
Things to come -
There's a lot more on the Metis Industries plate than that, but these are the things that stick out the most! Metis Industries was slow in coming - it all began with one 3D printer that just didn't want to work. This printer was a MakerFarm 8" Prusa i3 that we loveingly refer to Prusa. Prusa was purchased August 2013 as a kit, was assembled by me and my husband over the course of a couple weeks, and refused to read files off of an SD card. This meant we couldn't print. After many hours of him trouble shooting, frustration, and my refusal to assist, Prusa took its place in the back corner of my husband's workshop, there to collect dust and other sundry things.
Fast forward to January 2015 - I had been studying to get my A+ certification, and with my technological ego at an all time high decided that yes, I could get Prusa working, and wouldn't that be a lovely Valentine's Day gift? I learned the circuit diagrams, taught myself how it was to operate, how to work the software, connected Prusa directly to my computer, and fired him up. Ability to read files? Check. Ability to control the printer motors through the software? Check. Ability to warm up? Check. Ability to print? CHECK!? After some research I discovered that somewhere along the lines, people figured out that Marlin (the printer's software) was unable to read off of SD cards for some reason or another. *facepalm* The thing had worked the entire time and we never knew! This new hobby quickly engulfed me and I found myself running Prusa every moment he had uptime. This, of course, meant that I had become a professional Prusa maintenance woman, all of my free time being spent fixing him. Why the downtime? Because poor old Prusa has this nasty habit of rattling himself apart as he's mostly made of WOOD. Yes, someday I'll be able to tell my grandchildren that my first 3D printer was made of wood. And then they shall laugh and laugh. With my new found obsession came another - designing 3D models to print. Check out my designs at Thingiverse, Makerbot's repository of 3D models. At the urging of my family, they suggested that since I was designing and printing, why not start selling? I used to sell fiber arts supplies, so why not get back into it? I brushed them off as insane to suggest such a thing, but with both me and my husband designing 3D models, it started to seem like the sane idea. That, coupled with the frustration of Prusa's downtime, we expanded the fleet to four 3D printers. With a love for teaching, the next step in the expansion of Metis Industries has been to offer tutoring and lesson services in 3D printing, as well as STEM subjects. With a background in science, especially geology, amateur astronomy, and some teaching and tutoring, it just made sense. Our most recent expansion of Metis Industries's services was to add a laser cutter to the mix, so now we offer wood laser cutting services. We've produced things such as signs and logo bearing goods. We'll eventually expand it to acrylic as well. Hello and welcome to Metis Industries blog! Here you'll be able to find more in depth information about Metis Industries, Kim, and the technology and STEM subjects that piques her interests. Kim likes to keep up with current events and advances in technology, so keep checking in.
We'd love to know how you found us, so please contact us or comment below! |
AuthorMy name is Kimberly Schumann and I'm the owner of Metis Industries. Archives
February 2020
Categories |
 RSS Feed